

The article page is where readers spend most of their time. Surround the article with what helps them: a table of contents, the author and date, ratings, related articles and more, placed exactly where you want them.
Who can do this: Owners and Admins (Editors through Customize on your help center) · Plans: All plans
Add a component to the article page
In the template editor, open Pages and pick the Article page.
Under Regions, click Main. It's split into three zones: Before the title, After the title and After the article.
Under the zone you want, click its add button, for example Add to "After the article".
Pick a component, for example Was this helpful? for ratings. It's added to that zone and its settings open.
Add any others the same way, then click Publish.
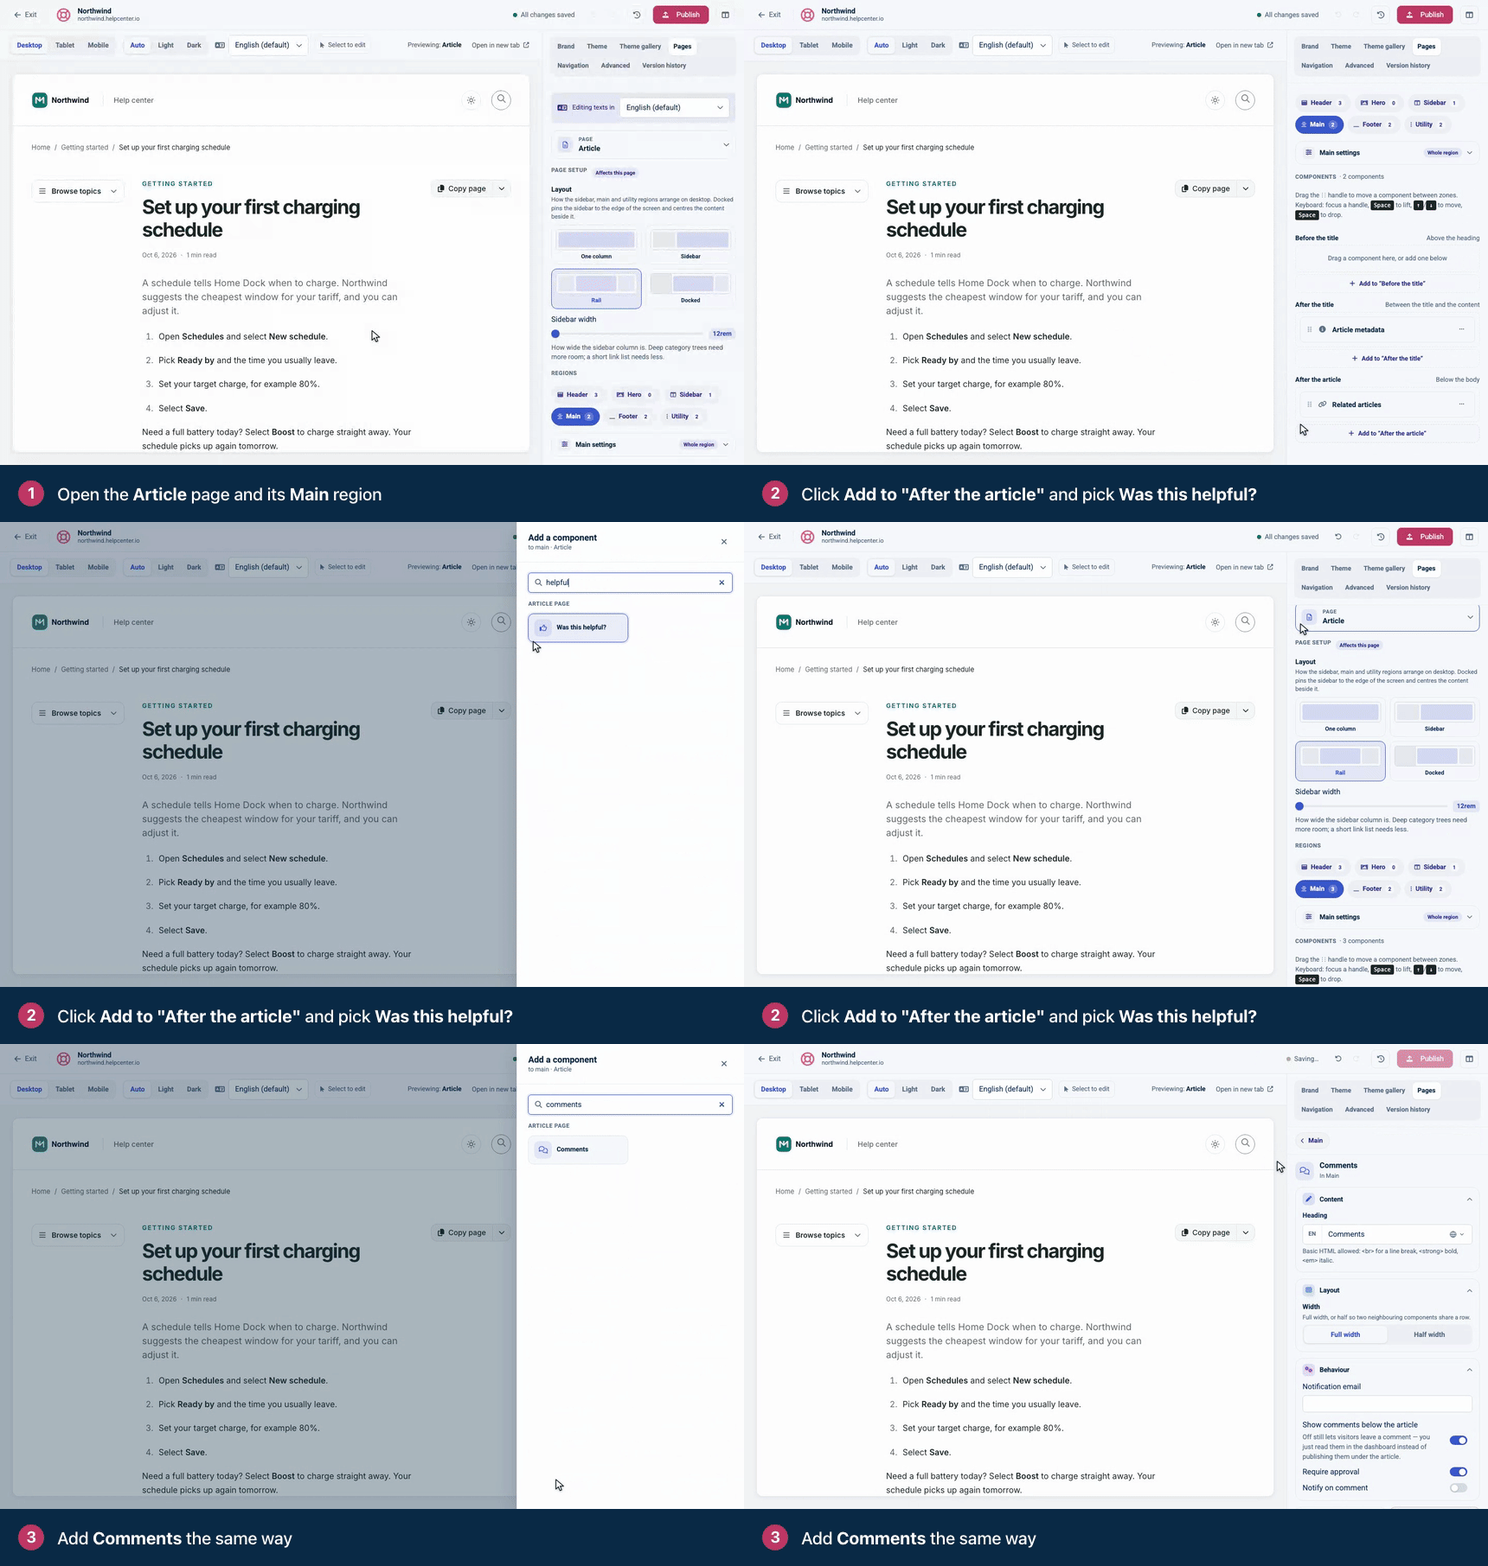
To move a component within a zone or to another zone, drag it by its handle (⋮⋮). With a keyboard, focus the handle, press Space to pick it up, move it with the arrow keys and press Space to drop it.
The Sidebar and Utility regions work like any other region: click one and use Add component.
What every article page shows
Two things appear on every article page without being components:
The breadcrumb trail above the title, with links from your home page through the article's categories.
The category label just above the title, in your primary color. It links to the article's category.
They aren't in the list of components, so you can't remove them in the template editor. To hide them, add custom CSS that targets .hc-breadcrumbs or .hc-article__eyebrow. See Add custom CSS.
Article page components
Component | What readers get | Where it can go |
|---|---|---|
Breadcrumbs | A trail of links from your home page through the article's categories. It has no options of its own. Article and category pages already show this trail above the title, so adding the component there shows it twice. | Main, Header |
Table of contents | Links to the article's headings. Heading levels sets how deep it goes (H2 only, down to H5), and Sticky keeps it in view as readers scroll. Sticky holds the whole column it sits in, so components beside it stay in view too, and the column stays put while any component in it keeps Sticky on. Components without a Sticky setting, such as the Export menu, always count as on. | Sidebar, Utility |
Article metadata | The author, the last-updated date and the reading time, usually right after the title. See Show or hide the author, date and reading time. | Main, Sidebar |
Export menu | A Copy page button that copies the article as Markdown, with a menu of more ways to take the article away. See What the export menu offers, below. | Main, Sidebar |
Was this helpful? | Rating buttons: thumbs up, heart and thumbs down, or thumbs only. Turn on Ask for feedback to ask for a comment after a thumbs down. | Main |
Comments | A comment form under the article. Turn off Show comments below the article to collect comments without showing them. | Main |
Related articles | Similar articles, chosen by Default (similar content), Same category or Most recent. | Main, Sidebar |
Recently viewed | The articles this reader opened recently. | Main, Sidebar |
Share buttons | Twitter, LinkedIn, Facebook, Email and Copy link, laid out Horizontal or Vertical. | Main, Sidebar |
In Main, you can also add general components such as Rich text, Custom HTML or a Divider. Set a component's Width to Half width to put two side by side, for example the article metadata next to the export menu.
For ratings and comments, including where you approve comments, see Add ratings and comments to articles.
What the export menu offers
Readers click Copy page to copy the article as Markdown, ready to paste into an AI assistant or a document. The button reads Copied! when it's done. The arrow beside it opens the rest:
Readers see | What it does | Its setting |
|---|---|---|
Copy page | Copies the article as Markdown. | Copy page |
View as Markdown | Opens the article as plain text in the browser. | View as Markdown |
LLMs full | Opens your whole help center as one Markdown file. It shows only while search engines are allowed to index your help center. | LLMs full |
Open in Claude, Open in ChatGPT | Starts a chat that asks the assistant to read the article, so the reader can ask questions about it. Both show only on articles anyone can open without signing in. | Open in Claude, Open in ChatGPT |
Print article | Opens the browser's print dialog. | |
Download PDF, Download Markdown | Saves the article as a file. | PDF, Markdown |
Use with AI | Opens the setup page of your public MCP server. It shows only while your help center has one. | Use with AI |
To choose what readers get, select the Export menu in the template editor and untick the actions you don't want. With Copy page unticked, readers see a single Export button that opens the menu. Alignment places the button on the left, in the center or on the right of its space.
The Markdown versions follow the same access rules as the page itself: a reader who can't open an article can't copy, view or download it either.
Choose a layout
Under Page setup, pick the article page's Layout:
One column keeps readers focused on the text.
Sidebar adds a column beside the article, for example for a Content tree of all your categories.
Rail adds a sidebar on one side and a Utility rail on the other, a good home for the table of contents.
Docked pins the sidebar to the edge of the screen, like a documentation site. On smaller screens it opens from a Browse button.
To make long articles easier to read, set Content width to Custom and narrow the reading column. Page width and Column spacing sit next to it. See Pages, regions and shared headers explained.
On phones, the columns stack. A Content tree in the Sidebar and a Table of contents in the Utility rail each fold into a one-line bar (Browse, or the tree's heading, and On this page) that readers tap to open, so the article starts near the top of the screen. The table of contents bar sits above the article when the Utility rail holds only article navigation: the table of contents, the export menu, article metadata, share buttons, dividers or spacers. Add anything else to that rail, for example Related articles, and the whole rail stays below the article.
A proven setup
Every article page already shows the breadcrumb trail and the article's category above the title. Build on that:
Article metadata after the title, with the Export menu beside it at half width.
A Content tree in the Sidebar and the Table of contents in the Utility rail, with the Rail layout.
Was this helpful? after the article, followed by Related articles.
Comments only if your team will read and answer them.
Check the result on a short article and a long one before you publish.
Troubleshooting
The table of contents doesn't show. It's built from the article's headings, so articles without headings don't get one. It also needs to be in the Sidebar or Utility region. See When does an article show a table of contents?
All my share buttons disappeared. Editing the Channels field can remove every share button today. Delete the Share buttons component and add it again to get all five back.
Use with AI is missing from the export menu. It shows only while your help center has a public MCP server. See Let readers use your help center in their AI assistant.
Open in Claude, Open in ChatGPT or LLMs full is missing. The two assistant links show only on articles that anyone can open without signing in, on a help center that search engines may index. LLMs full needs the same indexing setting. Check also that the action is still ticked on the Export menu component.
Comments
Be the first to comment.