

Give readers a contact page where they can message your team, with article suggestions that often answer the question before they send it. The contact page stays hidden until you tell HelpCenter.io where to deliver messages.
Who can do this: Owners and Admins (Editors through Customize on your help center) · Plans: All plans
Switch on your contact page
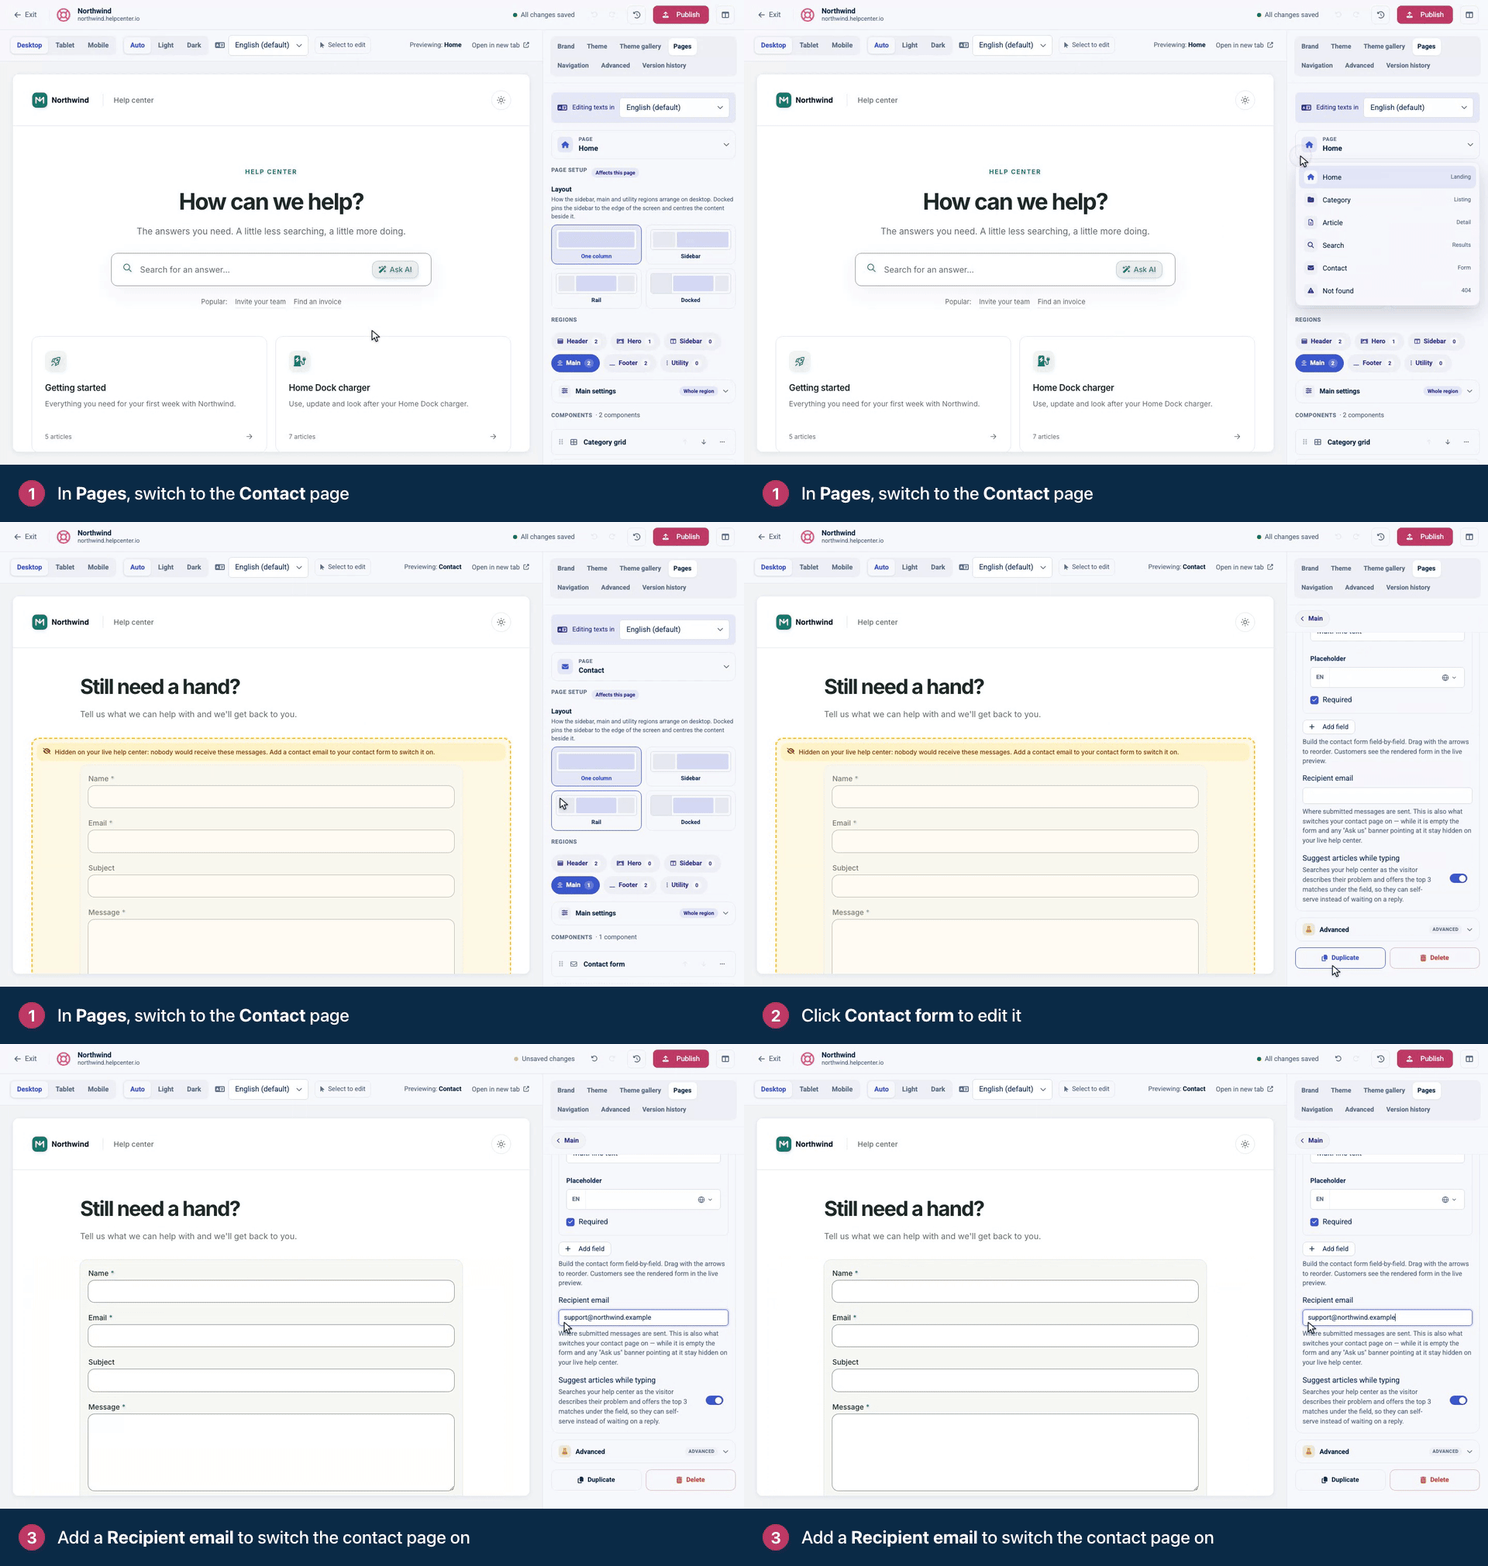
In the left menu, click Template editor. Open Pages and pick Contact in the page menu.
In the Main region, click Contact form to edit it.
Under Recipient email, enter the address that should receive messages, such as your support inbox.
Click Publish.
Until the form has a recipient, the preview shows it inside an amber notice: "Hidden on your live help center: nobody would receive these messages. Add a contact email to your contact form to switch it on." Readers see no contact page at all, so nobody sends a message into the void.
Once you publish with a recipient, these switch on together:
Your contact page, at
/contactson your help center.Contact links in your header and footer.
"Ask us" buttons (the Contact CTA component) that point to your contact page.
The contact form in the widget, which sends to the same address.
Choose the fields
Under Form fields, each field has a Label, a Field name, a Type, a Placeholder and a Required checkbox. The types are Single-line text, Email, Phone, Multi-line text, Dropdown and Checkbox.
Click Add field to add one. For a Dropdown, add its choices with Add option.
Use the arrows to reorder fields and the trash icon to remove one.
Field name is the internal name the value is sent under. You rarely need to change it.
Keep the form short: name, email, a subject and a message are enough for most teams. Keep an Email field, because your replies go to that address. Add a Dropdown only when the answer changes who handles the request.
More options
Option | What it does |
|---|---|
Heading | The contact page's title. Left empty, it reads "Contact us". |
Submit label | The button text. Left empty, it reads "Send message". |
Success message | What readers see after their message is sent. |
Suggest articles while typing | On by default. As readers describe their problem in the first Multi-line text field, the three best-matching articles appear under it. |
Width | Full width, or Half width to share a row with another component. |
Confirmation email (under Advanced) | Emails readers a confirmation that you received their message. Write your own Confirmation email subject and Confirmation email text. Both can use |
Suggestions work best when your article titles use the words your customers use. In a confirmation email, set honest expectations, such as when you usually reply.
What your team receives
Each message arrives by email with the subject "You've got a new support request", from no-reply@helpcenter.io.
The email holds the message and every field the reader filled in. Reply to it and your answer goes straight to the reader's email address.
Confirmation emails also come from no-reply@helpcenter.io, and replies to them reach your recipient address. With no subject of your own, it reads "[Site name Support] Thanks for your support request". A subject that contains a link, an email address or a domain name is replaced with that default.
The form uses Google's invisible reCAPTCHA to block spam, so there's nothing to set up. It loads a script from Google on your contact page.
Add "Ask us" buttons to other pages
The Contact CTA component is a "can't find it? ask us" banner with a button. Add it to the Home, Category, Search or Not found page, in the Main, Utility or Footer region. Set its Heading, Subtext, Button label and Button url: a page such as /contacts, a mailto: address, or a full link to your own helpdesk. Turn on Custom content to write the banner in your own HTML instead.
A banner whose button points to your contact page stays hidden while that page is off, and so does one with no destination. The preview shows why with an amber notice.
You can also place a Contact form in the Home page's Main region, so readers can write to you without leaving it. Keep the one on the Contact page too: your contact page and the links to it depend on it.
Test it
Publish your changes. The form's button is inactive in the preview, so testing happens on your live help center.
Open
/contactson your help center in a private browser window.Send a test message, then check that it arrives and that your reply reaches the address you entered.
Troubleshooting
The contact page shows "not found", or the "Ask us" button is missing. The published form has no recipient. Add a Recipient email and publish. See The contact form or "Ask us" button is missing.
Messages don't arrive. Check the recipient address for typos, and look in your spam folder for mail from no-reply@helpcenter.io. See I'm not getting emails from HelpCenter.io.
You changed the form but your help center didn't. Click Publish. Edits stay in your draft until you do.
Comments
Be the first to comment.