

Your header and footer frame every page: your logo, menu, search and language picker at the top, and your links, social icons and credits at the bottom. Set them up once and they show across your whole help center.
Who can do this: Owners and Admins (Editors through Customize on your help center) · Plans: All plans. The language switcher needs more than one language (Growth and Catalyst plans).
Edit the header
In the template editor, open Pages, pick a page, and click the Header region. The note at the top of the region says whether your changes show on every page or on this page only (see "One header and footer for every page" below).
Click the component you want to change: Logo, Navigation, Search bar or Language switcher. Use Add component to add one that's missing.
Change its settings. Use Position to arrange the row (see below).
Click Publish.
Header components
Logo shows the logo or site name from the Brand tab. Variant picks Logo image or Brand name (text), and Link target sends clicks to your Help center home or Your main website. See Add your logo, favicon and brand name.
Navigation shows the links you add in the Navigation tab. Variant: Horizontal, Vertical (sidebar) or Pills. See Add links to your header and footer.
Search bar lets visitors search from every page. See Customize the hero and search bar.
Language switcher lets readers change language. Variant: Dropdown or Inline list. Label style shows the language's name, its name plus the native name, or its code. It lists your default language and every language with at least one published translation.
Arrange the header row
Logo, Navigation, Search bar and Language switcher each have a Position: Own row (block), or inline on the left, in the center or on the right. Inline components next to each other share one row, such as a logo on the left with the menu and language switcher on the right. In the region's list, they're grouped as Inline row 1, Inline row 2 and so on.
Edit the footer
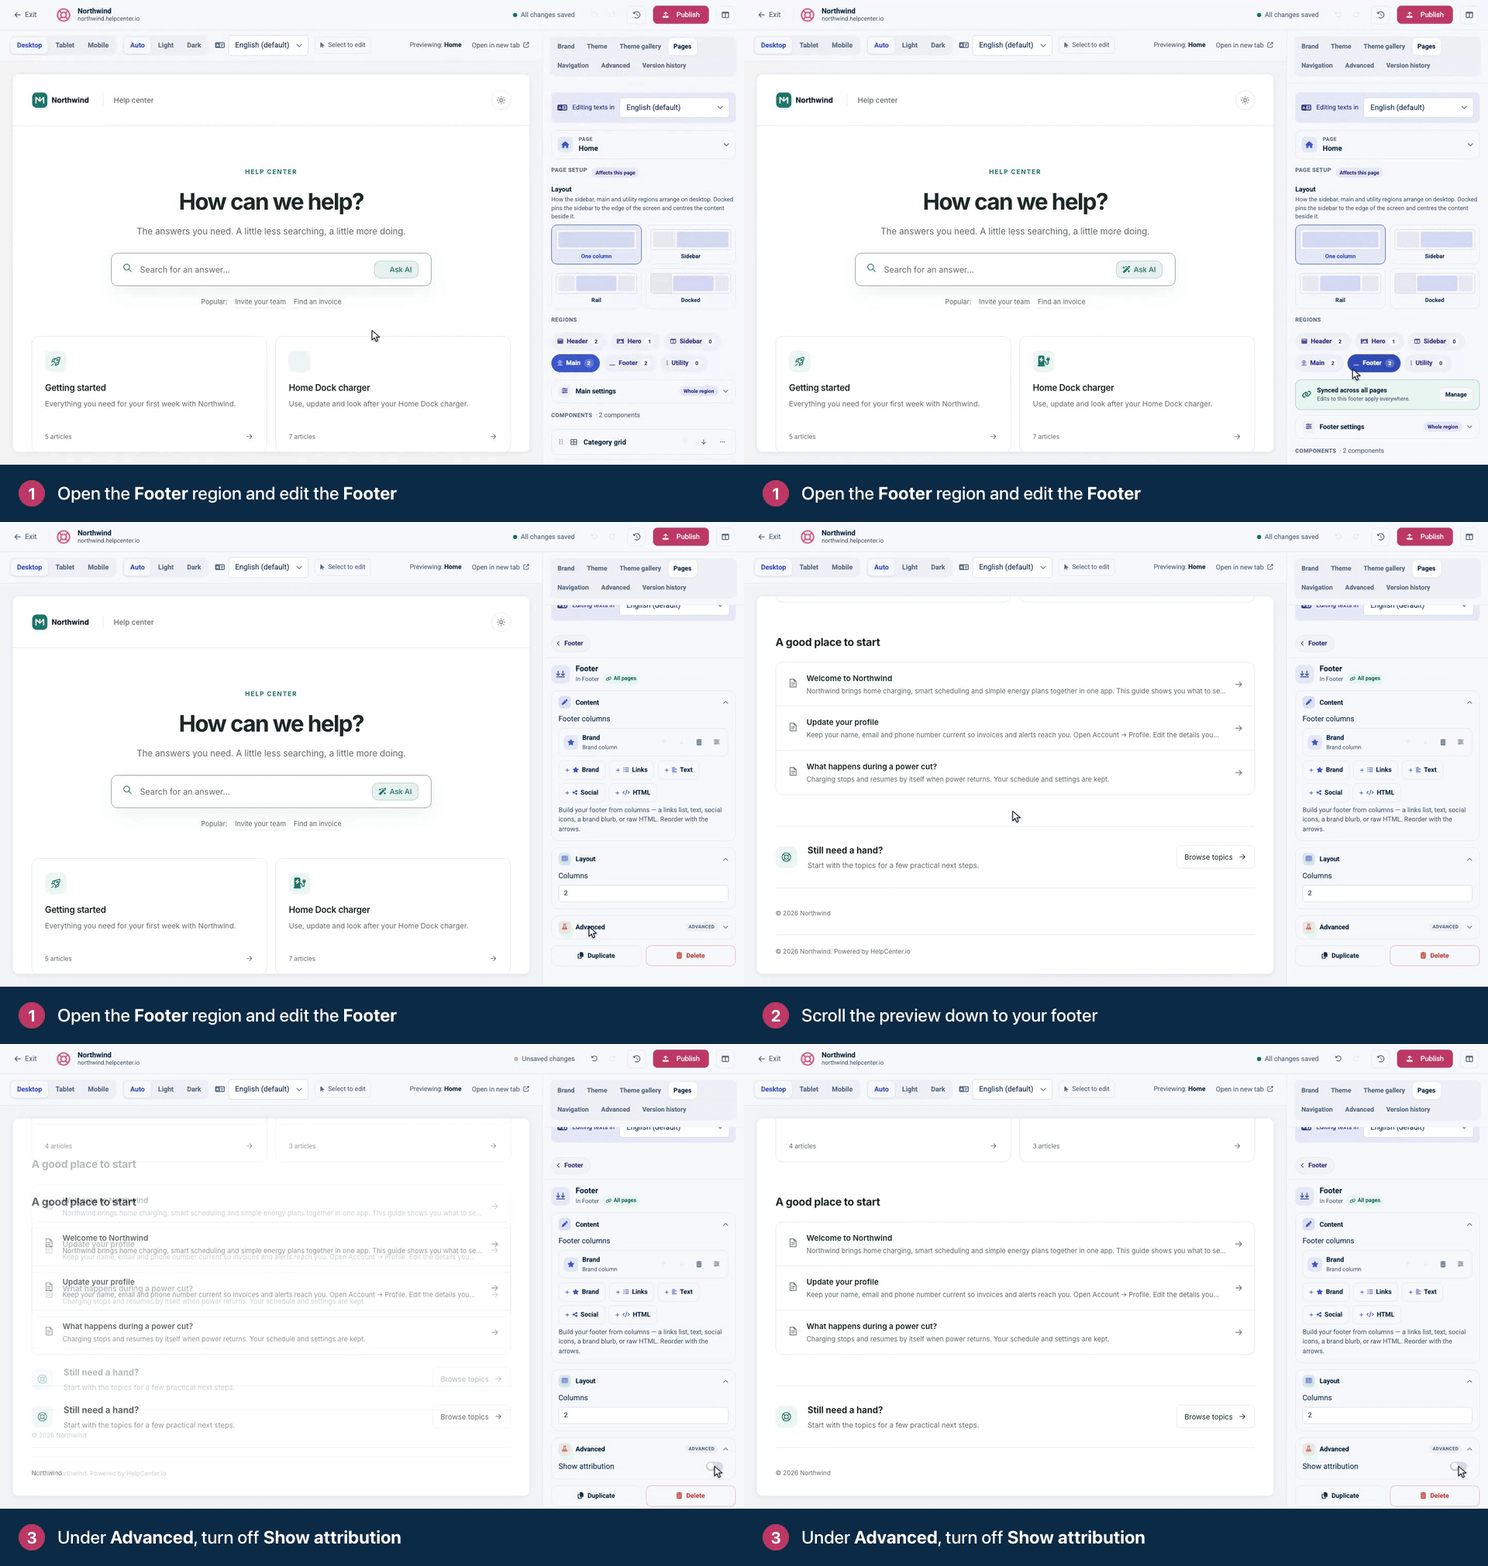
In Pages, click the Footer region, then the Footer component.
Under Footer columns, click Brand, Links, Text, Social or HTML to add a column. Until you add one, the footer shows your site name, tagline and navigation links.
Click a column to fill it in. Reorder columns with the arrows, or remove one with the trash icon.
Set Columns to how many columns sit side by side on larger screens (1 to 4).
To hide "Powered by HelpCenter.io", open Advanced and turn off Show attribution.
Scroll the preview to the bottom to check your footer, then click Publish.
Column | What it holds |
|---|---|
Brand | Your site name and tagline from the Brand tab. |
Links | A Column title and a list of links. Each link goes to the Home page, a Category, an Article or an External URL. Click Add link for more. |
Text | A Column title and a paragraph of text. |
Social | Icons that link to your social profiles. Paste each profile's full link, and leave a field empty to hide its icon. |
HTML | Your own HTML for the column. |
Removing the attribution works on every plan. See Remove "Powered by HelpCenter.io".
Social links
For a row of social icons outside the footer columns, add the Social links component to your footer, header or Utility region. Fill in the networks you use (Twitter, LinkedIn, GitHub, Facebook, Instagram and YouTube) with your handle, such as company/acme for LinkedIn, or paste your profile link. Each icon always links to that network's own site, and empty fields don't show.
One header and footer for every page
A region marked Synced across all pages is the same everywhere: a change you make on one page shows on every page. Footers usually start synced. Headers start synced only where the theme gives every page the same header. Compass, for example, adds a search bar to the header of category and article pages, so each page starts with its own header.
While you edit a component, the label next to its name shows how far the change reaches: All pages, or one page, such as Home only.
To sync a region whose pages are separate, open it on the page whose version you want, click Apply this header to other pages and then Keep in sync everywhere.
If the region says Not the same on every page, click Choose, then Keep separate headers or Use this header everywhere. Until you choose, an edit changes only the page you make it on.
To stop syncing, click Manage and choose Give each page its own setup.
Syncing replaces the region on the other pages with the one you're looking at. You can undo it with ⌘Z. See Pages, regions and shared headers explained.
Troubleshooting
The menu in my header is empty. The Navigation component shows the links from the Navigation tab. Add your links there.
The language switcher is missing. It needs a second language with at least one published translation. On a help center with one language, themes leave it out: add it with Add component once you have a second language.
My header change shows on one page only. The header isn't synced, or its pages differ. Make the change on each page, or sync the header first (see "One header and footer for every page" above).
Syncing the header removed something from my other pages. The page you synced from had a different header, and it replaced the others. Press ⌘Z, or add the missing component back: the change syncs to every page.
A block I added to the Compass header is squeezed in beside the logo. Compass now gives each block you add to the header a line of its own: above the logo row when you place it before the Logo, below it when you place it after the search and other tools. Help centers that applied Compass before this change keep the theme's earlier Custom CSS. To get the new behavior, open Theme gallery, click Compare & apply… on Compass, untick everything except Custom CSS and click Apply theme, then publish. This replaces the CSS under Advanced → Custom CSS with the theme's, so copy any CSS you added yourself first and paste it back afterwards.
My logo links to the help center, not my website. Fill in Your main website under Brand, and set the Logo's Link target to Your main website.
Comments
Be the first to comment.